Saturday, September 29, 2012

"Monogram" Baby Cards

Hello there!  Today I wanted to post a few baby cards I made awhile back, in honor of a dear friend of mine who is being induced tomorrow with her fourth baby!  I call these "monogram" baby cards, but the reason for the quotes is that they are truly not a monogram, as in the child's initials, but instead simply feature a large letter (from the sentiment) on the card.  This is a great way to use up random chipboard letters or letter stickers you might have floating around in your craft stash!
 
For this first card, you'll see that I feature a large green letter "B", to pick up from the sentiment "oh baby!"  This was for a little boy, so I stamped in blue and used blue patterned paper (Becky Higgins baby kit paper, retired; stamp Michaels)


This next card features the letter "C" from the "cherish" sentiment--this time for a little girl.  
 (Becky Higgins baby kit paper, retired; stamp A.C. Moore, blush ink CTMH)


Well, I am off to stay with my friend in the hospital!  Hope you have a creative day and thanks for checking in!


Wednesday, September 26, 2012

Fall Leaf Cards

Happy Fall Y'all!!
 
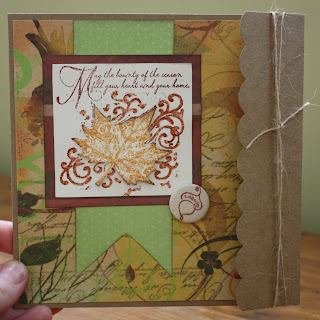
I am so excited that fall has finally arrived.  Of course, here in Florida, the ONLY way you'd know it was fall is that Starbucks now serves Pumpkin Spice Lattes and Dunkin' Donuts has Pumpkin Donuts--yum!  Anyway, I have to have my fall leaves this year only in craft form...hence these fall cards I made last week!  I used CTMH's new quick card Bountiful Season stamp set. This is a nice one because it features a beautiful leaf/swirl pattern AND sentiment all in one stamp!  As you can see below, I made various versions of the same card using different ink colors and patterned paper.  I started with CTMH Kraft card bases which are 6x6 in size and have a cute little scallop flap.  I wrapped this flap with jute button twine (PTI) and tied it in a knot.  For the patterned paper, I used Olivia paper pack (CTMH, retired) and the Flirty paper pack (CTMH, mustard patterned paper only).  I stamped with either Barn Red or Goldrush ink (CTMH).  Then, whatever color I stamped with for the main image/sentiment, I then stamped another image in the opposite color and cut out just the leaf.  Then, I paper pieced the leaf on top of the image, popping it up on foam dots for a bit of dimension (you can see the shadow in the first card that demonstrates this dimension).  Then, I outlined the leaf stem and the swirls with glitz glitter gel (stardust)--I love how it makes the image pop and glisten!
 
Here are a few samples of the versions I created...


(Olivia papers, mocha opaque pearls)


Up close of the stamped image:


(Olivia papers, featuring pear green, canvas badge button with acorn stamp from fall Petite Perks stamp set, retired)


(Flirty paper pack, mustard paper, Olivia paper for maroon banner, wooden badge button with acorn stamp from fall Petite Perks stamp set, retired)
 
 
I can't wait to pop these into the mail to thank some friends and family members for their love and let them know how BLESSED I am to have them in my life!!


Friday, September 14, 2012

Isaac's Birthday Invitations

 
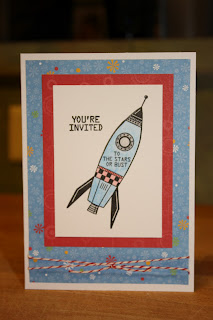
I want to share one of my latest craft projects with you--birthday invitations for my sweet son, Isaac.  At his request, he wants a "rocket party" with "Buzz Lightyear and pandas."  I always hate going the commercial party route, and since he isn't that much into the whole Toy Story cast, I figured just a regular space-themed party would be best for him (with some pandas...his favorite animals...thrown in, of course).  Here are the invitations I came up with:


About a week after talking with Isaac, I saw that CTMH had come out with a new space-themed stamp set, Outta this World, in their fall/winter catalog--perfect!  I paired it with a retired paper pack, Animal Cookies, black ink, and then broke out my colored pencils (CTMH) and some red baker's twine. 


The card inside was fun to do, too.  I used the rock and roll stamping technique for the stars (Daffodil Delight and Tangerine Tango inks, SU), and then just random stamped them around the card.  The UFO was stamped in Pear ink (CTMH). All the sentiments are from the Outta this World stamp set and are stamped in black.  I really love the robot image (Basic Gray ink, SU)--in fact, if it were up to me, I'd choose to have a robot party!


I think Isaac was really pleased with how they turned out--he can't wait to give them to some friends in his class :)
 
Now for the thank you notes...

Tuesday, September 11, 2012

Treasure Life Cards

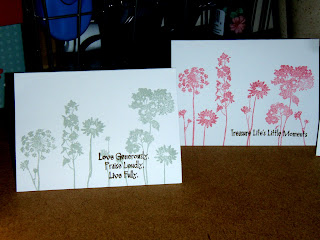
Some stamp sets are like old friends--I don't think I will ever tire of the set Treasure Life from Close to My Heart.  I think it actually may be retired now (sigh).  At any rate, what I love about this set is its simplicity and how fabulous it looks when you just no-fuss stamp it with one color.  My first card simply uses a few wildflowers from this stamp set stamped in Sweet Leaf (CTMH) ink on a white card base.  Then, I used a brown pen and a ruler to draw in an outline box (tried not to be perfect with it).  Next, I stamped the sentiment in chocolate ink.  The sentiment is a wood and rubber stamp from the $1 bin at Michael's--I must say I LOVE sentiments that have multiple font styles in them--I am a total sucker for script with print, etc. 


I like how it turned out--just a great simple note to send a friend.  (As always, you can click on the image to see it bigger and in more detail)
 
 
For these next cards, I also used the concept of stamping in one color directly on the card base.  I randomly placed various flowers from the Treasure Life stamp set on a 4x6 acrylic block, so I was able to ink them all as ONE big group and stamp ONCE to make the entire card front--gotta love clear stamps!  I just changed up the order of the flowers for each card.  I used the sentiments that come in the Treasure Life stamp set in Cocoa ink (CTMH).  The ink colors for the wildflowers were Gray Flannel, Blush, Crystal blue, and Sweet Leaf (CTMH).


These cards made a sweet little boxed card set for a friend of mine last Christmas!
 
Hope you have a very blessed and creative day.  Until next time, friend :)


Sunday, September 9, 2012

Circle Rosettes Layout

Well, I couldn't post a Father's Day project without also including one I did for Mother's Day a few years ago, could I?  I had a very special Mother's Day with my two children, at the time, and enjoyed their cards.  This picture was taken that afternoon--it is funny because my son was crying, but the picture sort of made it look like he was laughing!  Gotta love that. 


At any rate, I made a very simple one-page layout to memorialize the day. I used an 8x10 print, matted it on white cardstock and then adhered that to a beautiful sheet of cardstock weight patterned paper (I got this paper in a pack from Michael's but cannot recall the brand--sorry).  Then, I journaled on kraft paper strips and adhered them to the page.
 
My embellishments were really fun to make. They are circle rosettes that you can easily make with a 1" circle punch. 


You need to punch out 9 circles from DOUBLE SIDED patterned paper. Eight of these circles will be used for petals and one will be the base.  To make the petals, fold each of the eight circles into thirds, overlapping each side (see picture). Then, adhere these 8 folded petals around in a circle right on top of the 9th circle base.  Next, adhere a button with a glue dot for the flower center. Lastly, adhere the flower onto kraft cardstock and cut around the flower leaving about 1/8" border--this will make the flower stand out from the patterned paper page. Finally, I cut leaves out (free-form from folded paper), adhered them around the flowers and drew a few stems with a brown pen.


You can also made flower buds by just using three petals (see below).


Hope you have a very creative day--see you again soon :)


Friday, September 7, 2012

Nursery Decor


Welcome back!  Just wanted to show you a great way to use up chipboard letters or letter stickers that might be lingering around in your craft stash!  I put this picture together just days before our third little one arrived on the scene.  I didn't know if it was a girl or a boy, so I made this picture that would be fairly gender neutral.  I freely placed letters to form the words of the saying on white cardstock.  After I was done, I trimmed the cardstock into a tight square.  Any extra spaces got a few embellishments--punched out stars, a jute bow, or a handdrawn and cut out moon shape.  I then adhered the cardstock into patterned paper (CTMH, Perfect Day paper pack) and used a black marker and a ruler to draw a border around it.  I framed it in a black metal scrapbook page frame from Michael's.  It turned out super cute and was super inexpensive to make for the nursery!