Thursday, March 29, 2012

Pemberley Kraft Card


This card is a great way to use up little bits of pretty scraps. I inked up the edges of each paper piece of patterned paper from CTMHs Pemberley collection with Indian Corn Blue ink before adhereing them to the kraft card base (CTMH). The sentiment is stamped from the CTMH Card Chatter Sympathy set and the flower is from CTMH Card Word Puzzle--it is stamped on a canvas badge button--love those. They take ink really well and make a great little embellishment. The inside sentiment states "and chase the cloud away" (not pictured). Thanks for stopping in today.

Wednesday, March 28, 2012

Just for You Kraft Card


This card features an adorable little flower and sentiment from CTMHs Just for You stamp set. This is a fun stamp set because you can customize each flower petal with your chosen design and ink color (I used Olive, Lagoon, and Sunset from CTMH). The center of the flower is a pewter badge button--these are self-adhesive so they are very handy. I took various sized scraps of the Stella paper collection (CTMH) and inked the edges in Cocoa ink before adhering them onto the kraft card base. Then, I notched the card flap with some sharp micro-tipped scissors and threaded some twill ribbon through and tied into a bow. Hope you enjoy and thanks for stopping by :)

Tuesday, March 27, 2012

Pemberley Die-Cut Card


I made this card using some of my favorite supplies--foundry pin clips (CTMH) and pearl adhesive gems (CTMH). The die-cut card base is from CTMH--they are a lot of fun to work with. The sentiment and flower were both stamped in Indian Corn blue ink with CTMHs Card Word Puzzle stamp set. I popped the flower up on 3D foam tape (this works to hold the pin clips nicely, too). The paper collection is from the Pemberley paper pack and the decorative border is a "zip strip" from one of the patterened paper sheets--love that. As always, you can click on the picture to see it larger. Thanks for stopping by :)

Thursday, March 22, 2012

Peeps Cards


I am having a lot of fun with a new spring stamp set "My Peeps" by CTMH. I made a few cards, (inspired by CTMH's Spring/Summer Idea Book) for some special family members and I love the sentiment "Happy Easter to my peeps" that came with the set--very cute. I used Regal Rose cardstock and ink (SU) and stamped the bunny peep image, cut it out, and then on the center image, I popped it up using the new adhesive springs from CTMH. So, the card will mail flat, but then when the they are opened by the recepient, the bunny peep with spring out to them--very fun.


On one of the cards, I used a bit of pleated ribbon from SU, and as for the green paper, I used bits of scraps from Creative Memories and CTMH Miracle paper pack. A chocolate marker (CM) was used to make the eyes and nose look like chocolate dots. Yummy and cute.


Wednesday, March 21, 2012

Peeps Gift Bags


I am really starting to get excited for Easter around here. The azaleas are in full bloom and temps are getting into the 80's--spring has definately "sprung" here in Florida. In that spirit, I was able to do a little bit of crafting with the kids last week to make some Peep gift bags for their preschool friends. My daughter, Natalie, helped a lot with the stamping and my son Isaac enjoyed coloring in the images with colored pencils, as did Natalie and I--it was definately a fun group project for Spring Break.
These gift bags are super easy! Basically I purchased "pretzel bags" in the gift bag section of Michael's--they come in a large pack plenty for lots of different projects. Then, I bought several Peeps boxes of different colored bunny peeps and cut them apart using kitchen shears. Then, I slid three into each pretzel bag. Next, I cut a rectangle out of white cardstock, folded it in half, stamped my images/colored them in on the front, and then stapled each cardstock topper onto each loaded gift bag to seal. I tried to use coordinating ink for the sentiment to match the color of Peeps in the bags. I recently got a Peeps stamp set from CTMH (called "My Peeps") so I plan to make more of these with the actual bunny peep stamp image soon, so expect to see more when I get the chance to ink that stamp set up.
The kids were excited to help...and eat some leftover Peeps afterwards, of course.

 
Here's the one I used with CTMH's My Peeps Stamp set--it turned out cute, too.
Supplies used:
ink: (SU) Melon Mambo, Daffodil Delight, Tempting Turquoise, Old Olive, (CTMH) Gypsy, black
stamps: Happy Easter (Michael's), Eggs (Sensational Season, CTMH), Crafted with Love (CTMH back labels)

Tuesday, March 20, 2012

Stella Kraft card


Still enjoying the Stella papers and wanted to share with you a new card I made using CTMHs Kraft card bases. I am so used to the typical A2 card size, so this was fun to play with a square dimension and a little flap to boot. I basically used scraps of patterned cardstock (didn't measure) and inked them with Cocoa ink--love how this paper pack takes Cocoa ink--it really makes the edge POP. And then used a paper flower left over from Creative Memories and added a wooden button with some embroidery floss tied in it for a little bit of interest. My favorite part is the two pin clips (CTMH) I used behind the flower. I then inked the entire card front and flap. I stamped a "thanks for your kindness" sentiment from Fiskars on the orange cardstock square. I think next time I would like to add two slits in the flap and tie a bow using white grosgrain ribbon. I plan to pop this in the mail to my sweet sis-in-law to thank her for the amazing care package she sent to my family from her recent trip to Hawaii. Not only did she send great Hawaiian print clothes for the kids and myself, but carmel chocolates and coffee for me and my hubby. Thank you so much Beka!

Monday, March 19, 2012

Stella Birthday Card


I am having a BALL with this new paper pack from CTMH called "Stella"--it is spunky, funky, and eclectic. I whipped up this EASY birthday card today, thanks to direct inspiration from Jen Patrick. I used the stamp punch from Creative Memories--it is handy because it can be used anywhere on the page--and just adhered the postage stamp cut-outs onto my white card base after inking the edges with Cocoa ink. I stamped the sentiment from the Party Pennants stamp set (CTMH) in Cocoa ink. Then, as a final touch, I used a doily flower from the Bohemian assortment (CTMH). So easy and cute.

Thursday, March 15, 2012

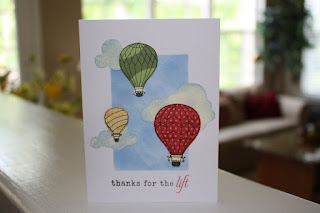
Hot Air Balloon Card


For this card, I used a mask and sponged on Bashful Blue (SU) ink in the mask's window to create the blue square for the sky. The sentiment, clouds, and balloons are from a PTI stamp set Up, Up and Away. I paper pieced the balloons and popped them up using 3D foam tape. It took a little time, but I like how it came together.

Wednesday, March 14, 2012

Flower Card


I stamped this card using a really fun stamp set from SU called Fabulous Florets. I liked that it combines solid image flowers with outlined image flowers and leaves, which gives a neat effect. I mounted it on Melon Mambo cardstock and used this same ink for the solid flowers. The other flowers and leaves I stamped with various ink cubes from their current Brights collection. The sentiment comes with the stamp set, too. I was careful to rotate the flower images in different directions when I stamped them. I like how it turned out.

Tuesday, March 13, 2012

Masculine Birthday Card


Sometimes it is hard to make masculine birthday cards with traditional scrapbooking supplies. This card is so versatile because it could be for a birthday or congratulations card and could be given to an older man or a young boy. I also like it because it is sort of "edgy" and fresh. I used versamark ink to stamp the houndstooth background stamp (from CTMH noted backgrounds stamp set) on kraft cardstock. Then I tied a piece of natural twine around the cardfront before adhering it to my white cardbase. The circles come from a set called Boy Basics: Simple Circles from PTI--I stamped them in a row using some SU ink from their brights collection. Then, I cut the row of circles out with my micro-tipped scissors and added a brad for a little touch of interest before adhering the circle row down. The sentiment is stamped in black fron CTMHs party pennants stamp set. Very easy

Monday, March 12, 2012

Digger Birthday Card


Birthday cards are the most common ones I make these days and they are a lot of fun. In fact, birthday cards are what got me started making cards in the first place because I found as my kids were getting invited to all sorts of birthday parties, that I was always in need of a card--and that can get expensive and send you on lots of extra errands to find gifts AND cards. So, being that I was a scrapbooker and always had paper scraps on hand, I started to put them to use to make kids' birthday cards. Anyways, this card features that great digger stamp I used last month for Isaac's valentines (see post here) from CTMH's Playin' Hard stamp set. I stamped it in CTMH goldrush ink, cut the image out with fine-tip scissors and then adhered it to a scrap of patterened paper. Next, I added two strips of patterened paper on top and bottom of the card front. The sentiment is a rub-on from Target. Very easy little boy's birthday card.

Sunday, March 11, 2012

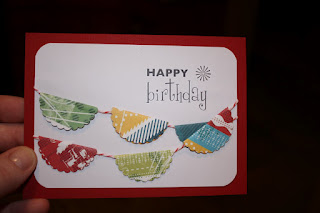
Happy Birthday Banner Card


Hi there--sorry I have been MIA for a week, but my family enjoyed a Disney vacation and have been getting over viruses and such. Wanted to share with you a birthday card idea--I have lots of March birthdays, in fact, my sister shares her birthday with two of my best friends on March 9th. So in the spirit of birthdays, here is a quick card I made using a scalloped circle punch and some great bakers twine. The sentiment is a rub-on I got years ago from the Target scrapbooking section, and I just used glue dots to keep the circles folded in half, and then another one behind each pennant to keep them firmly placed on the card front. Very easy and cute.

Thursday, March 1, 2012

Alphabet Canvas


Happy March to you :) I thought I'd share with you an alphabet canvas I made for my niece, Riley. It was inspired by one I spotted in Scrapbooks, Etc magazine a few years ago. It is both fun and functional for several different reasons--first, it is a cute way to display lots of pretty paper, embellishments, and letter stickers while decorating your child's room and teaching them the alphabet---and second, it is a GREAT way to USE UP scraps of pretty paper, embellishments, and letter stickers that are hanging around and cluttering up your craft space from previous projects. All the supplies you need are a large stretched canvas (Michaels), acrylic paint, assorted papers/embellishments/letter stickers/stamped images/image stickers, and a square punch. The size punch you'll want to use will depend on the size canvas you buy--you want to ensure you can fit 48 squares on it because you will be putting on the alphabet letters every other square (approximately). I used the purple "giga" square punch from Marva (Michaels) which cuts out a 2 1/8" square for mine.
First, you want to paint the canvas, including the stretched edges, in a paint color of your choice. I just squirt the paint directly on the canvas and spread it out with a foam brush. You can use several colors of paint, if you wish. Let dry. Next, apply punched out squares in a grid format (8 across, 6 down) with strong adhesive (liquid adhesive works well). Next, apply letter stickers or chipboard letters to every other square. Then, in the blank squares between letters, apply embellishments or stamp images that start with the featured alphabet letter it is after (for example, I placed an apple on the empty square after the "a"). If you have a lot of embellishments, you can also place one on the square of the featured letter, like I did with the "b" and butterflies (the square after b was made of butterfly patterned paper which worked out well).
Now, for the second row, start with the second square and place your letter there. You'll then place your embellishment in front of each coordinating letter on this row. Alternate with each row as pictured above. You'll have plenty of room until you hit the last row and then you'll place "u" "v" and "w" next to each other, skip a square and place "x" "y" and "z" next to each other. You can even place an ampersand sticker in the empty square infront of "x" like I did. If you want to preserve it well, you can coat the entire project with Modge Podge, going around dimentional embellishments like flowers and such. It turned out really cute and was a lot of fun to make.