Wednesday, February 29, 2012

Valentine Pencil Toppers


One more Valentine project for you before the Love Month closes out. I made these pencil toppers last year for my daughter's Valentine exchange at preschool. I found these adorable Valentine themed pencils in the Target dollar section and bought several packs. Then, I had fun using up some of my Valentine themed patterened paper from Making Memories--it was an 8x8 pack--I size I rarely use--so it was perfect to transform it into this project. To make each one, I cut out a 3" x 3.5" rectangle of pattered paper (this paper pack is all double sided) and then rounded the corners with a corner rounder (CM) and cut two little slits in it with a craft knife about a quarter of the way down from the top and bottom for the pencil to slide through later.
Next, I punched out a 2" circle of lighter colored cardstock and stamped a heart design on it with either red or black ink (heart stamp is Fiskars, dotted circle is CTMH Connections stamp set). Then I layered this circle onto a 2.5" circle of pattered paper--I wish I had a scalloped circle punch of this size--but I did not, so I used my old-fashioned scalloped decorative scissors to trim around it (these STILL come in handy). Then, I attached the scalloped circle to the rectangular cardstock using two brads--I felt this was the most secure way to do it, because the circle will curve quite a bit when you slide the pencil through. The last step was to print out a Valentine sentiment on some sticky address labels and stick it across the pencil on the back--this secures the pencil inside, covers the brad ends, and provides a place to say to/from.
They turned out super cute and were well received, and I enjoyed looking at the "bouquet" of them before we took them into school.
Tuesday, February 28, 2012

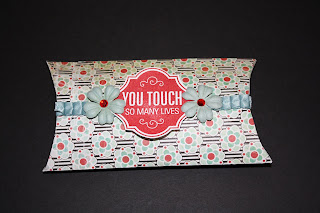
Pillow Box

This creation was made from an old piece of patterned cardstock that I've had in my stash for years. Honestly, I had grown tired of it and just didn't want to use it in my scrapbooks anymore. So, instead, I decided to use it for a little "pick me up" for someone special. I used a pillow box template I had recently bought from here. CTMH has a Cricut cartridge that can cut many 3-D boxes, including this one, in any size you'd want...but seeing that I do not have that cartridge (yet) or a Cricut (yet), I decided these templates would do the job. I had to size the box down a bit from the template, but it looked to be about a square, so I started with a 7x7" piece of paper and went from there and, using my red-line sticky adhesive, it came together pretty quickly.
For the trim, I used the new pleated ribbon from SU (thanks Heather) and stamped out the sentiment using this month's Stamp of the Month, Thoughtful Tidings, from CTMH using Riding Hood Red ink (SU). I cut the sentiment shape out (again, the Cricut could do this for me), and adhered it with glue dots. Then, I added a few flowers from my stash (Michaels) and some red gemestones in the centers.
I filled the box with Hershey Kisses and sealed up the end--done :) I love how craft supplies can come together, from lots of different sources, and make what I was tired with into a special treasure. I plan to give this to my small group Bible study leader in a few weeks--hope she enjoys it.

Monday, February 27, 2012

Teacher Valentine Gifts


I wanted to share with you what I made for each of the kids' teachers for Valentine's Day this year. This picture isn't the best--it is a bit dark and was quickly taken before we all headed out the door to preschool--you can see Isaac's Valentines in the baggy all ready to go to school and my planner. Anyway, this is such a fun gift bag to make and I have recreated it many times--I love how you can make TWO from just one sheet of beautiful patterned paper. This particular bag is "busier" than others I've made since I decided to use another patterned paper for the trim, but you could always choose a solid or a more subtle print. This "bag in a box" is inspired by Lisa Stenz's club kit from Nov 2010--be sure to check it out. I have also seen templates and tutorials online. Basically, the bag is constructed by making a square cardstock tray (1" high) and then wrapping a piece of 6x12" patterned paper around it to make sort of a funnel shaped bag. For this particular project, I used CTMH's Sweetheart paper pack (retired) and their Love Ya stamp set (retired) for the gift tag, using black and Regal Rose (SU!) ink. You'll want to use cardstock to make the bag base, but for the rest, the lighter weight patterned paper is fine. I've also found that the best adhesive to use for the actual bag is red-lined sticky tape--you can get it from SU or Michaels. You also may notice that I stamp in coordinating colors quite a bit, but if I don't have a particular ink color to match, like the pink in this case, I do not sweat it--you'll be amazed when you stamp with a similar shade how you can "trick" your eye into thinking that they match. At any rate, there is plenty of room on the back of the tag to write "to" and "from"--since the pattern of the tag is busy, I simply adhered a white sticky address label on the back to write on. Then, I used some black ribbon I had in my stash to tie up the bag after stuffing it with Valentine candies. I hope the teachers liked them!

Sunday, February 26, 2012

Isaac's Valentines

I know Valentine's Day was almost two weeks ago, but I did want to share with you what I did for my son's Valentine exchange at school before the month gets away from me. Since he only has 8 kids in his class, and I did not feel like dragging my 3 kids into yet another store, I decided to whip these up one evening during my craft time. I used one of my favorite "boy" stamp sets Playin' Hard (CTMH retired) for the digger image and stamped it in Basic Gray ink (SU!). Then, I cut a slit above the digger's scoop with a craft knife and layered a punched heart (Marva) which I had popped up with some 3D foam tape, so that the tip of the heart fit into the slit. I then stamped the sentiment with the smallest alphabet from CTMH's Trinity stamp set (love how you get 3 fonts in 3 sizes with this one stamp set), highlighting the word "dig" in the pun with Riding Hood Red ink (SU!). Then, I layered the stamped image on a piece of patterned paper from CTMH's Sweetheart collection (retired). Isaac seemed to really like them and I think they turned out "masculine" enough--hard to do with Valentine themed craft supplies sometimes :)

Saturday, February 25, 2012

Stella Desk Set

Back again with the same project as yesterday, just different papers and color schemes. This time I used CTMH's Stella paper pack. This paper pack is so unique--I would have never dreamed the colors Lagoon and Olive would go together...but they totally work. Be sure to check out yesterday's Pemberley desk set post for all the details and inspiration.
After making the notecard box using Valerie's template, I embellished it with a zip strip border across the top, stamped "NOTES" in Cocoa ink and adhered each cut out letter with 3D foam tape, and added a lace flower and button from CTMH's Bohemian assortments collection.
For the notecards, I layered white daisy cardstock on lagoon cardstock and added a simple stripe of sunset patterned paper near the bottom. I then had fun rifling through my button stash for gold, clear, turquoise, and orange colored buttons, and then tied them with brown baker's twine (PaperTrey Ink) and popped them on with a glue dot. I stamped various sentiments from CTMH's Card Word Puzzle stamp set on each notecard with Cocoa ink. I also stamped the flap of each envelope with the flower bunch from the same stamp set in Lagoon ink. Can't decide which desk set I like better--both are cute in their own way!

Friday, February 24, 2012

Pemberley Desk Set

I am feeling super inspired by one of CTMH's new spring paper packs, Pemberley. I am not really a "blue" person...I tend to gravitate more to warm colors and pinks...but this paper collection is fantastic. I put together this desk set which holds six handmade single-sided notecards and six stamped envelopes, which were directly inspired by Lisa Stenz and Valerie Stangle (box template).
I love that CTMH patterned papers are cardstock weight, which makes it easy to make a sturdy little notebox and show off both beautiful patterns on the paper--no need to line the inside (love that). You can't tell, but the bottom of the box is the dark blue pattern that matches the paper strip on the notecards. I stamped "NOTES" using the Trinity stamp set in Pacifica ink and trimmed out each letter, then popped them up using 3D foam tape. The border on top is the zip strip from one of the patterned papers--love how it all cordinates and yet isn't "fussy." Then, I used up some stray flowers I had (Michaels) from past projects and put an opaques pearl adhesive gem in the center for the top of the box and on each notecard.
The notecards came together pretty quickly.
I simply layered vanilla cream cardstock onto bamboo cardstock, added a decorative strip cut on one side with my scallop blade on my papertrimmer (Fiskars), and stamped various sentiments from CTMH's Card Word Puzzle stamp set (love this one) in Pacifica ink. I forgot to take a picture of the envelopes, but they were very simple, too. I simply stamped the small bunch of flowers from the Card Word Puzzle stamp set on the flap of each envelope. Seriously...the hardest part of this entire project...is deciding whether to keep it or give it away :)

Welcome

Hello there--I am glad you have come upon my little creative space. I am passionate about scrapbooking, stamping, and papercrafting, and want to share my enthusiasm about this hobby with you and hopefully provide you with some great inspiration and some eye candy :) I must say, most of my creations are just humble attempts to recreate, with my own creative spin, ideas I come upon from idea books and other crafty blogs. Hope you enjoy...and let me know what you think.